For the first 30-ish years of my life I didn’t understand the appeal of tacos. My only exposure to them came in the form of rubbery, pre-molded corn shells and mystery meat filling from a cafeteria steam table, so really, can you blame me? When I moved to Southern California I discovered tacos the way they were meant to be – fresh proteins, soft tortillas, crisp slaws, tangy sauces – and the rest, as they say, is history.
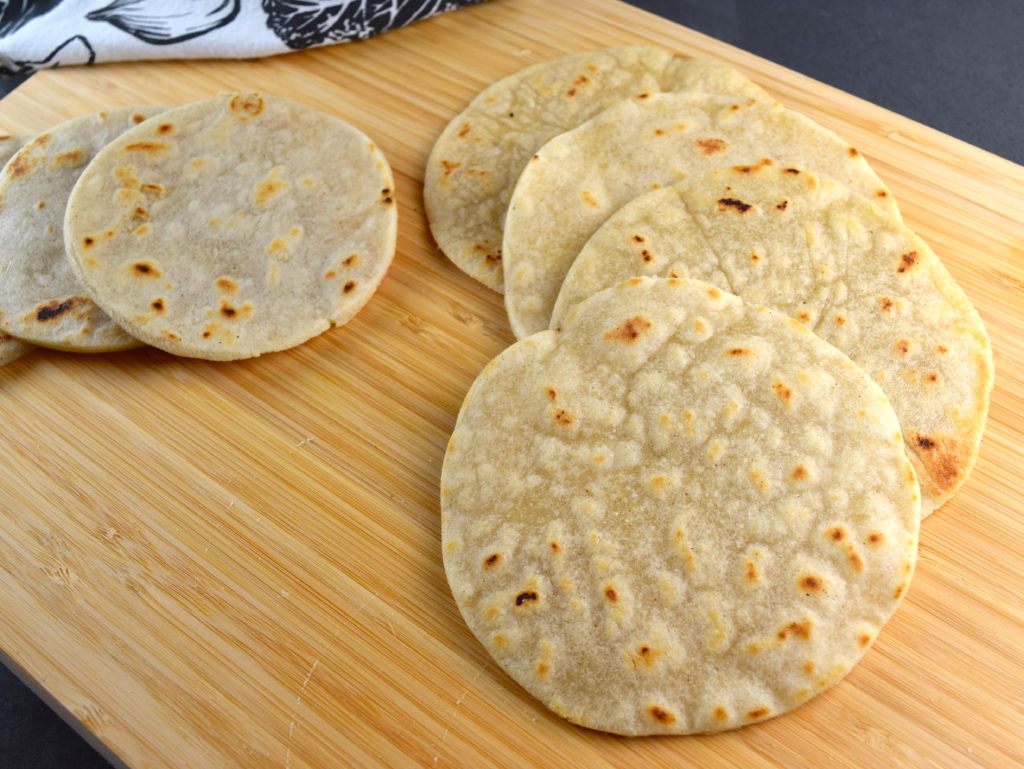
A good tortilla is the foundation of any taco worth eating. It should be sturdy enough to hold up to the fillings yet pliable enough to bend; slightly chewy, but with sufficient char to crackle in some spots when you bite into it. But getting the texture right is only half the battle; there’s still the matter of flavor, and that comes down to ingredients. Most taco purists will tell you that corn is the only “authentic” option for a tortilla, and since corn (or maize) is believed to have been domesticated in south-central Mexico as many as 10,000 years ago, that would make sense. However, there were regions in Mexico – most notably the portion of Northern Mexico that we now know as our US border states – where it was difficult to cultivate corn crops. Once the Spaniards introduced wheat to those areas in the early 1500s, flour tortillas became the norm for them. So yes, corn tortillas obviously came first, but there’s an argument to be made for the authenticity of flour tortillas in their own right.
For a classic soft taco you can’t go wrong with corn, but I love flour tortillas. Their neutral flavor lends itself to a wider array of fillings and I like to play around with non-traditional ingredients in my fusion tacos, so flour tortillas allow for more creative taco combinations. Since flour tortillas are typically made from wheat, I created my own gluten-free version that I think you’ll love. (If you prefer corn tortillas, Mark Bittman’s recipe for “Almost-from-scratch corn tortillas” is my favorite, and easy to find via Google.)
A few important points before you start cooking:
A proper tortilla requires a solid fat. If you try to substitute liquid oil you won’t get very good results.
A cast iron skillet or griddle is the ideal cooking medium for tortillas, but if you don’t have cast iron you can use a heavy stainless steel pan or a ceramic-coated nonstick pan. I don’t recommend Teflon pans for this because you need to get the pan really hot, and Teflon shouldn’t be used at high temperatures.
Fresh tortillas are best when eaten immediately after cooking. You can make them a few hours ahead and keep them in a sealed plastic bag at room temperature until ready to serve, but they may need a refresh in a hot skillet to soften before using. If you’re not going to use them within a few hours of cooking, freeze them in a sealed plastic bag and reheat in a pan before serving.
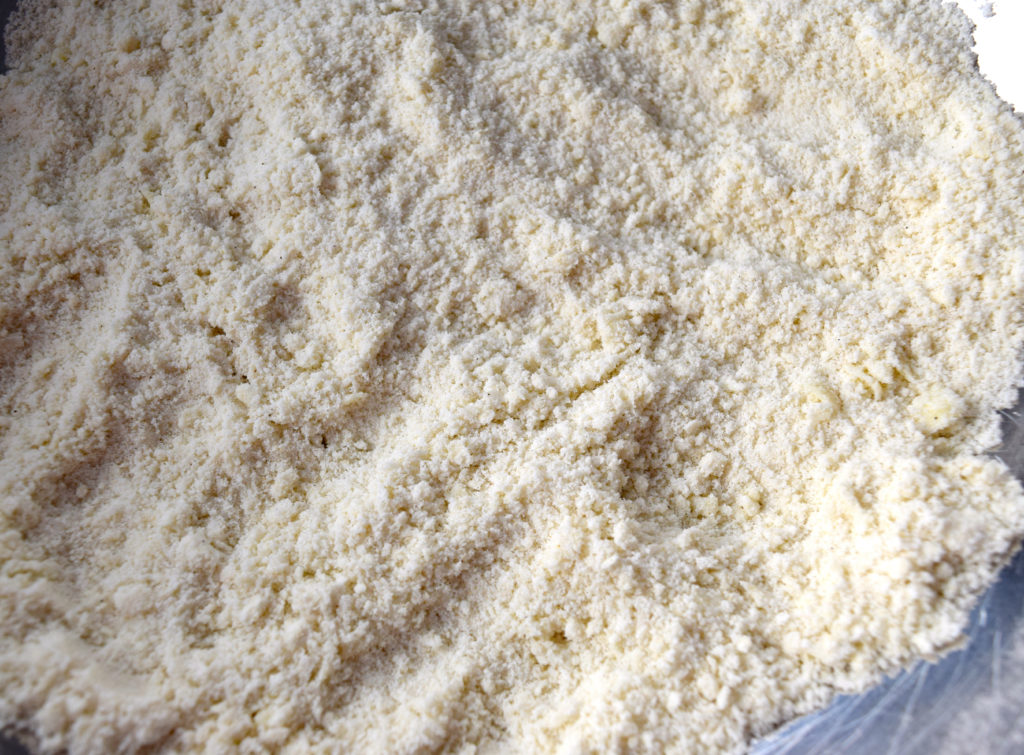
This is what your flour + fat mix should look like before you add the water. You’re aiming for the consistency of barely damp sand or fleur de sel (a.k.a. Celtic sea salt). If you find any nuggets larger than a small pea, work the mixture a bit more.
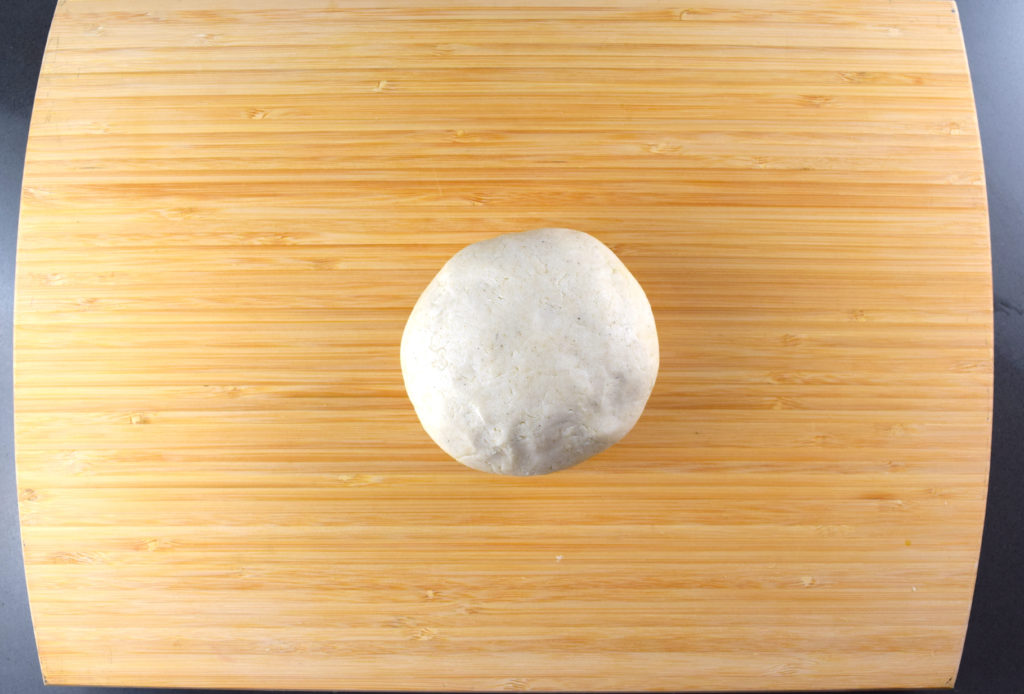
Here’s the dough after kneading – it should be soft and smooth. A few cracks are fine, but if it feels dry or crumbly go ahead and knead in a bit more warm water a teaspoon at a time until it gets there. You don’t want the dough to feel wet or sticky.
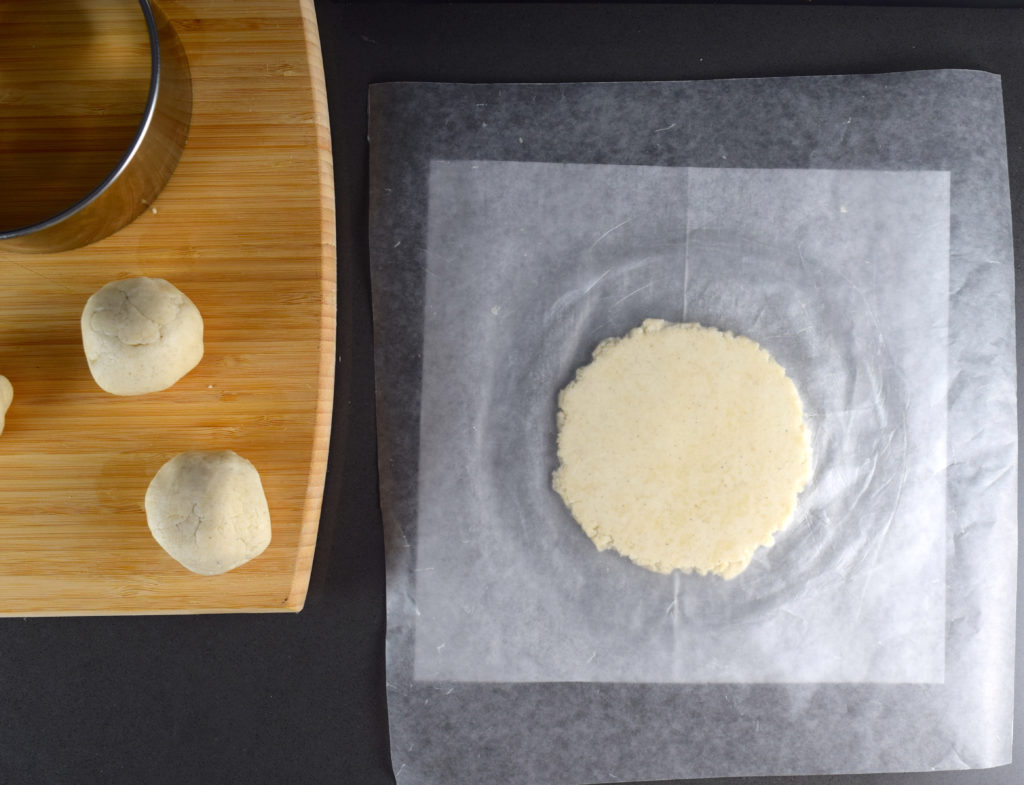
Don’t have a tortilla press? Neither do I. No worries – you can still make beautiful tortillas. I prefer to use parchment underneath and wax paper on top when pressing and rolling them out. Wax paper is great for seeing what’s happening, but it’s a bit delicate and has a tendency to crinkle or tear if you use it underneath the dough. Once you’ve pressed down your dough like this, grab a rolling pin and work it into a thin round about 6 inches in diameter. After rolling it out feel free to use a cake cutter like the one pictured on my cutting board to trim it into a perfect circle, and transfer the finished round to your sheet tray. The dough will dry out quickly, so I like to cover the pan loosely with a damp towel until I’m ready to cook the tortillas.
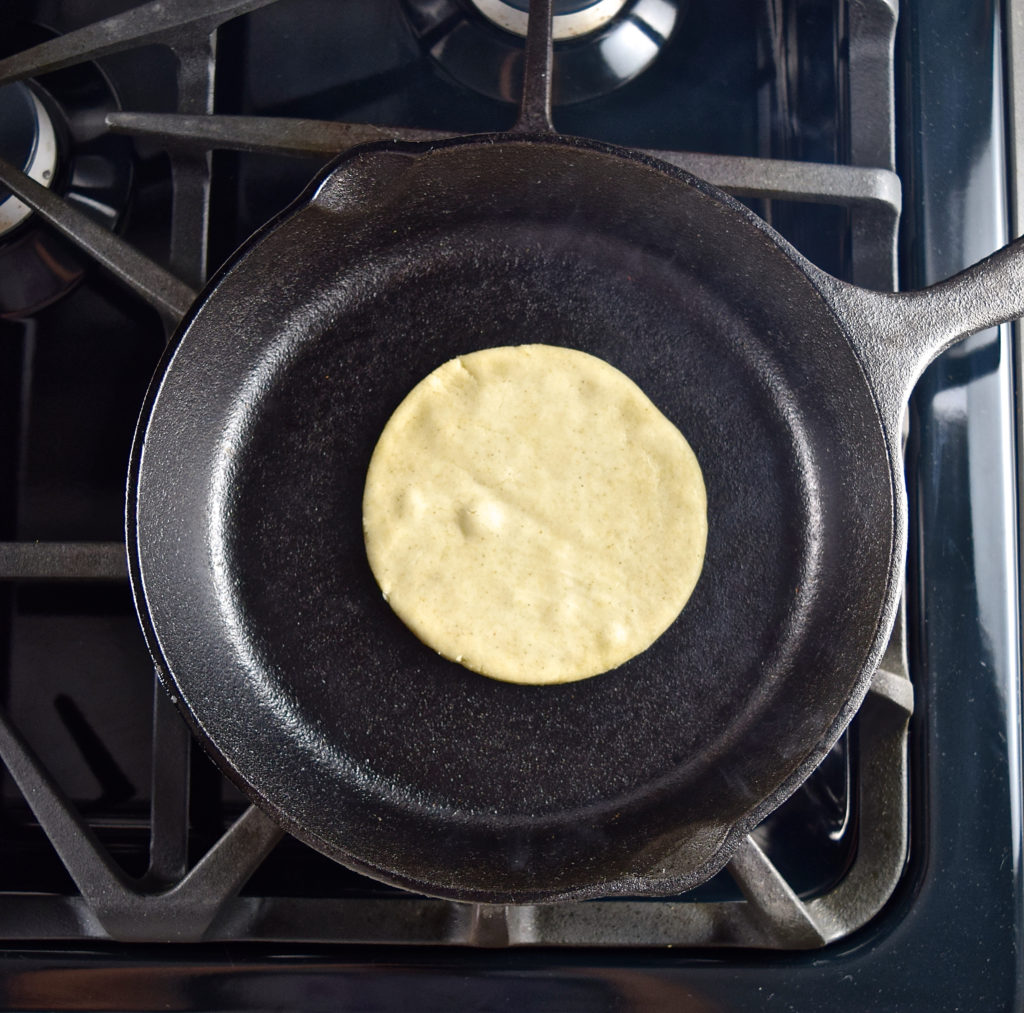
Give the pan plenty of time to get super hot – you want it on the verge of smoking. If you try to cook the tortillas in a pan that isn’t hot enough, they’ll take too long and come out pale and leathery. Once the tortilla is in the pan, look for bubbles to appear on the exposed surface. See those bubbles on the tortilla in the photo? This one needs about 15-20 more seconds to get really bubbly before it’s flipped. If your tortillas don’t bubble or puff at all within the first 25 seconds, your pan isn’t hot enough.
- 48 grams (½ cup) brown rice flour
- 58 grams (½ cup) white rice flour
- 58 grams (½ cup) sorghum flour
- 51 grams (6 tablespoons + 2 teaspoons) tapioca starch
- 70 grams (6 tablespoons + 2 teaspoons) sweet white rice flour
- Scant ½ tsp xanthan gum
- 1 teaspoon Kosher salt
- 1 teaspoon baking powder
- 58 grams (5 tablespoons) vegetable shortening*
- 156 ml (¾ cup) warm water (85-90°F)
- Tapioca starch for dusting
- Make the dough: Sift the flours, xanthan gum, salt and baking powder into a large mixing bowl and whisk to combine thoroughly. Break pieces of the shortening (or lard) into the bowl with your fingers, and use your hands or a pastry blender to work the fat into the dry ingredients until bits of fat are distributed throughout - you’re looking for a texture similar to slightly damp sand, and there shouldn’t be any chunks larger than peas.
Drizzle in the warm water and mix with a fork or wooden spoon until it begins to come together, then knead the dough until soft and smooth. Remember Play-Doh from when you were a kid? That’s what you want it to feel like. If your kitchen is very dry and the dough is cracking or crumbly, knead in more warm water a teaspoon at a time until you get the right consistency. Wrap the dough tightly in plastic and refrigerate for at least one hour. - Press the tortillas: Remove the dough from the refrigerator and allow it to sit at room temperature for a few minutes before proceeding - when you roll it out it should be cool, but not cold. Meanwhile, preheat a cast iron pan over medium-high heat for at least 5 minutes or until hot.
Divide the dough into 10 equal portions (about 50 grams each) and roll into balls. Line a sheet pan with parchment and lightly dust the parchment with tapioca starch; set aside.
If you have a tortilla press, now would be the time to get it out. Cut two circles out of wax paper and lay one on the bottom of the press. Dust the surface lightly with tapioca starch, place a ball of dough in the center, sprinkle on a light dusting of tapioca, and set the other circle of wax paper over the dough. Press the lid down to flatten the dough. Peel off the wax paper and transfer the tortilla to the prepared sheet tray, using a 6-inch metal cake cutter to trim the edges if desired. Repeat the process with the remaining dough.
Don’t have a tortilla press? Not to worry, you can achieve the same results with a glass pie plate or heavy skillet and a rolling pin. Lay a sheet of wax paper on your work surface and dust lightly with tapioca starch. Set a dough ball in the center, dust the dough with a bit more tapioca, and cover it with another sheet of wax paper. Place a glass pie plate or heavy skillet on top and press down firmly and evenly to flatten the dough. If the tortilla looks too thick after pressing, use a rolling pin *over the wax paper* to roll out the tortilla to the desired thickness. Peel off the wax paper, transfer the tortilla to the prepared tray, and use a 6-inch metal cake cutter to trim the edges if desired. Repeat the process with the remaining dough. - Cook the tortillas: Transfer one tortilla to the preheated skillet and cook for 45-60 seconds, until bubbles puff up all over the surface and the underside begins to brown. Flip the tortilla and cook for about 45 seconds on the other side. Both sides should have nicely browned spots. Transfer the cooked tortilla to a plate and repeat with the remaining tortillas, stacking the cooked ones on the plate as you go. When finished, cover the stack of cooked tortillas with a warm kitchen towel until ready to serve.


[…] 4 large or 8 small tortillas, store-bought or homemade […]